ShopDreamUp AI ArtDreamUp
Deviation Actions


Suggested Deviants


Suggested Collections


You Might Like…


Description
Instructions:
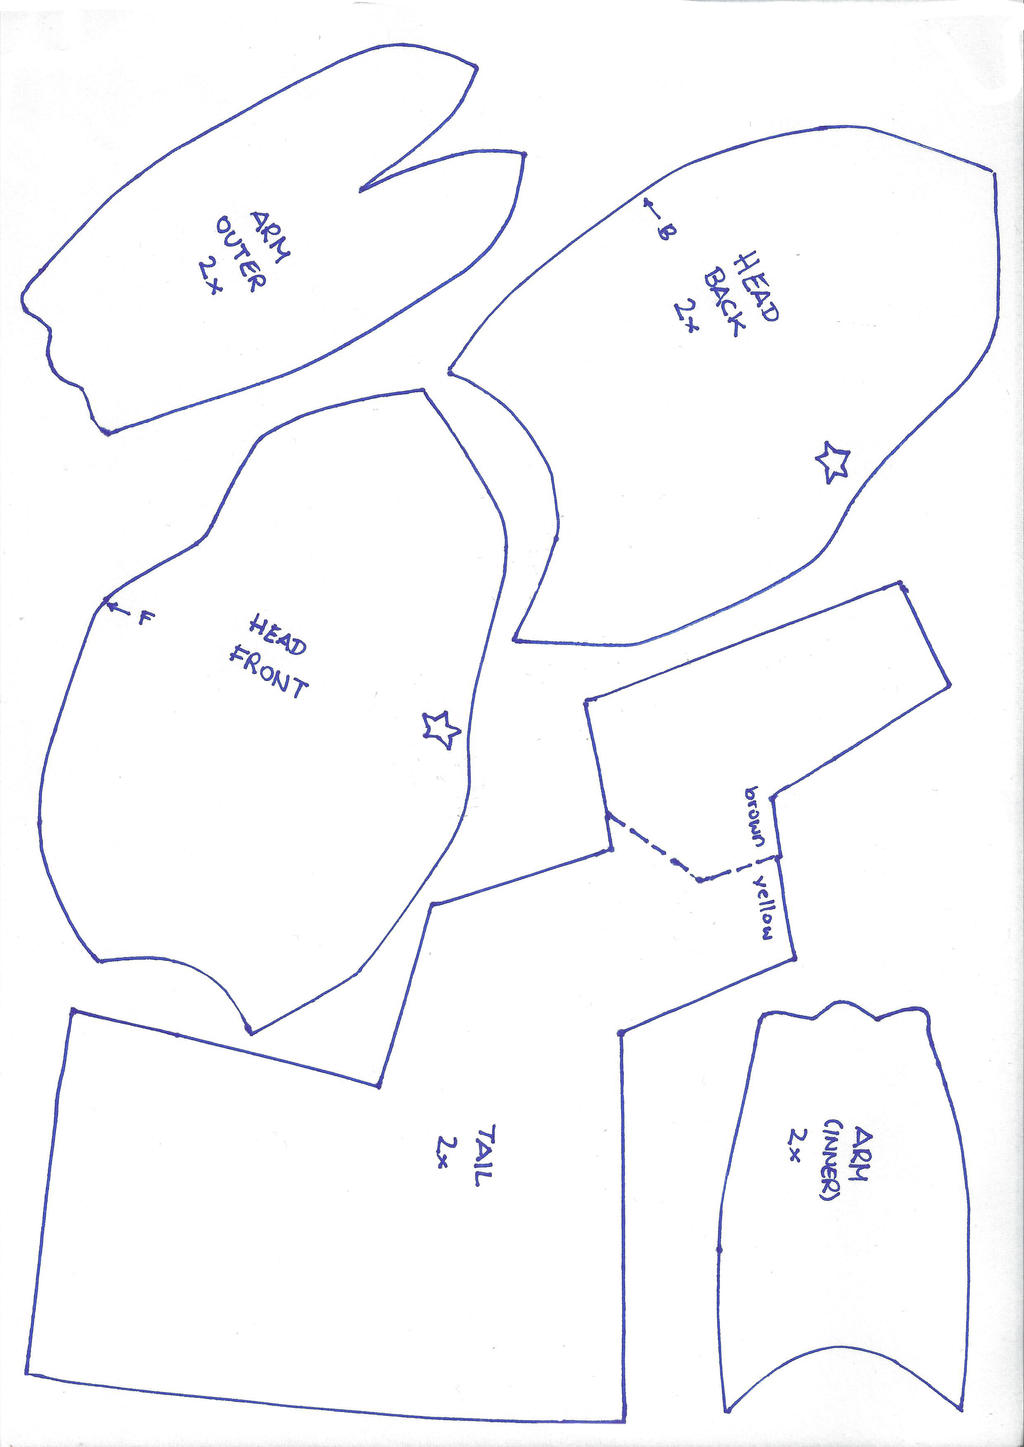
cut out the half-almond shaped pieces on the back out of brown fabric if you want to sew it in, otherwise cut along the dotted line and sew brown applications on, after the back is sewn together
1) sew alle the darts on wach piece (body front and back, arm)
2) sew the two back pieces together and sew the brown stripes on or in, depending on which way you chose - BUT DON'T sew it completely together. leave the yellow part of the back which is just above the upper brown stipe open
3) sew the front body parts together and then sew it onto the back (the stars indicate which sides schould be sewn together)
4) repeat with the head - front to front, then front to back (if you want to embroider a face, do it beforehand!) - BUT DON'T sew the back part together, leaving it open makes everything alot easier!
5) sew the arms together (one inner and one outer), turn the body inside out, so that the right side is not showing, stuff the arm through the hole, pin it in place and sew it on. you need to cut slits every cm or so in the seam allowance of the body part, otherwise attaching the arm will be more difficult than it already is!
6) leave the body like it is - right side inside, and turn the head right side outside if it isn't already. pin it in place - cut slits on the curved part of the head, so that you can stretch it to a straight line - pin it down an sew it on. since the back isn't closed completely you can align it properly.
7) after the head is attached, you can close the head up. It's enough if the back part stays open. after you've done that, turn it inside out through the hole you left in the back, stuff it and close it up.
8) sew all the brown and black parts onto the ears and the tail.
9) sew the two tail pieces together - you can leave it open at the small end to turn it around, but it'll be a bit mire difficult - turn it inside out, stuff it to your liking and close it up.
10) the ears should be left open at the end which goes onto the head. hide the ugly raw edge when pinning the ears to the head and sew 2-3 times around it. make sure that the base of the ear sits like an "o" on the head and not like an "I" (if you get what I mean)
11) sew two foot pieces together on the cirved line, but leave an opening where it'll be attached to the body (which is on the upper right side if you take a look at my pattern). sew in into the sole. (if you need help with that, take a look at some of my tutorials!)
then turn it around and stuff it. you can close it up, but it's not needed, since it'll be sewn on just like the ears.
12) pin the tail into place where you want it to be and sew in on on the base and somewhere on one of the edges onto the body, otherwise it'll flop around.
13) add the face if you already haven't done so!
Pt.1
Plush
Please give me credit when using my pattern, thanks~
Image size
2480x3504px 1.43 MB
© 2016 - 2024 Luminous-Luchador
Comments5
Join the community to add your comment. Already a deviant? Log In
Thanks, I am going to utilize this pattern and slightly tweak it to suit my needs. I will later come back and show you the finished plush. Thanks for sharing this pattern with us, it's a great help!